 This article is about the Real World |
|---|
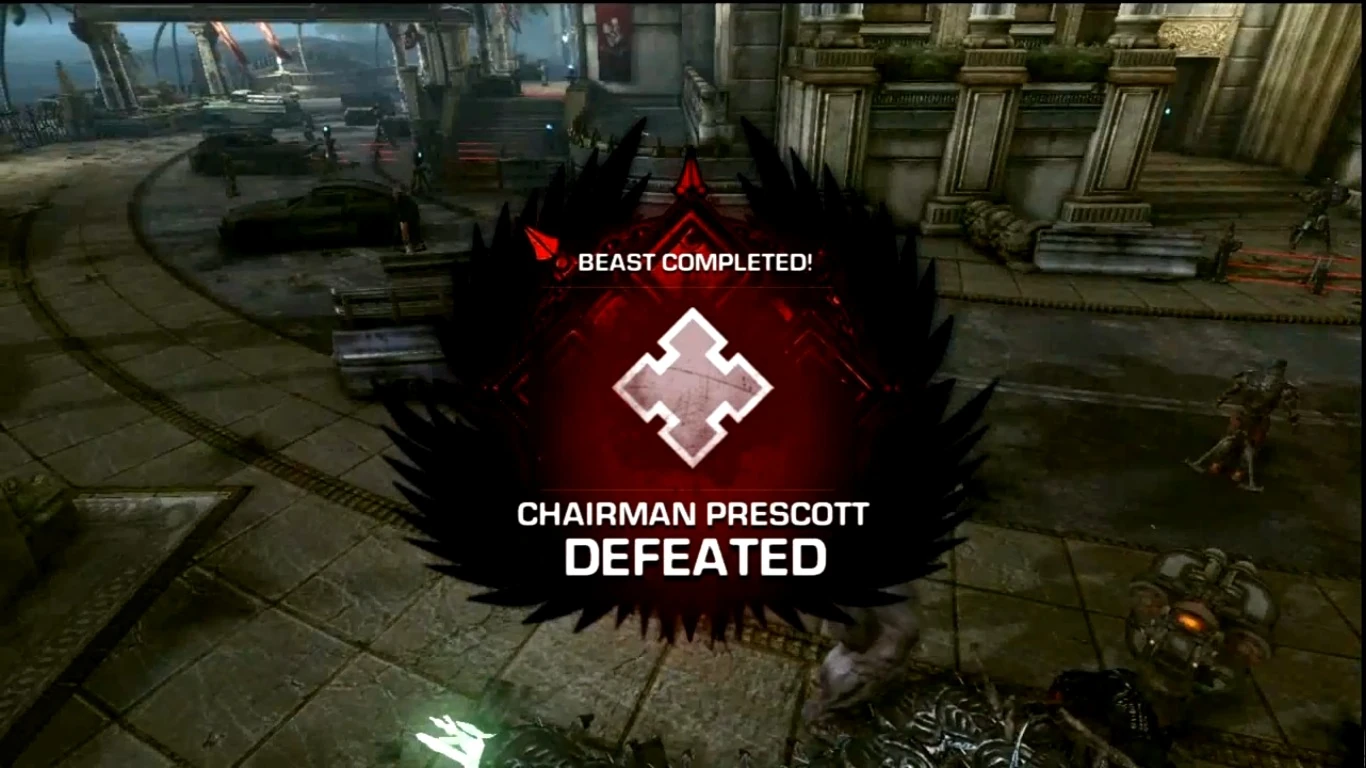
The screen shown upon completing all twelve waves of Beast mode.
Beast is a multiplayer game mode introduced in Gears of War 3 where players take control of different creatures in the Locust Horde in an attempt to kill all enemy humans; it is thus a reverse of Horde 2.0[1] with several key differences, such as having more than one life per wave, non-regenerating health, and a strict time limit that can be increased by killing enemies and destroying fortifications.[2]
Up to five players can choose to be anything from a Ticker to a Berserker.[1] The objective is for players to kill a certain number of humans each wave, from the ill-equipped Stranded to the well-trained Onyx Guard, before a Hammer of Dawn strike kills all players once the timer fully counts down. Killing enemies and destroying fortifications unlocks cash and tiers of stronger Locust creatures.[1]
Completing Beast on all 4 difficulties without failing will unlock the Savage Theron character for multiplayer. There are several achievements that are also unique to Beast.
Gameplay
There are twelve waves in total. Each wave begins with a one-minute time limit, with bonus time added for killing humans and destroying fortifications (such as barriers, decoys, turrets, and auto-turrets). If players fail to kill all enemies in the time limit, they will be instantly killed by a Hammer of Dawn strike and given the chance to retry the wave with a time penalty being added onto their total time played.
As well as having to buy Locust creatures, players will also have to unlock different tiers of more powerful Locust by killing a large amount of enemies, attacking fortifications, and progressing through the waves. Even if players have the money to buy a powerful creature, they will have to wait until later waves to unlock that creature. There are four different tiers to be unlocked.
Like Horde 2.0, the enemies get more difficult to overcome as the waves progress. Waves begin with players fighting against Stranded, who rarely use cover, are ill-equipped, incredibly weak, and have little combat experience. Eventually, the Stranded are replaced with regular COG Gears, who do use cover, are better equipped, and will put up a fight. On the final (twelfth) wave, Richard Prescott and the elite Onyx Guard appear as a "grand finale" of sorts.
After the first wave, unique characters from the Gears of War franchise appear, labelled as "Heroes". Heroes can only be killed by executions once they are downed, including all possible melee attacks, while they are immune to bullets from "normal" weapons like the Mk 1 Lancer Assault Rifle or Gorgon SMG. Note that explosive weapons like the Boomshot and Bolo Grenade can kill them when downed.
Certain Locust bear unique characteristics in terms of player experience; for example, the Berserker has reduced vision for the player, but is incredibly resilient to damage and extremely powerful - able to kill all enemies in a maximum of two hits, and most fortifications in just one attack. The Kantus is able to heal or revive Locust on the battlefield and can use Ink Grenades to kill or prevent humans from moving to a certain area or using a turret or Silverback. Almost all the humanoid Locust can perform executions on downed humans.
Playable Locust creatures
There are fifteen playable Locust creatures. Each one has unique abilities and cost a certain amount of cash to play as. Locust creatures are split into tiers, and individual players will unlock later tiers depending the amount of money they can get. To allow smaller groups a better start off, they have the benefit of getting stronger creatures earlier due to less money being split with the team.
Due to their different abilities, certain Locust creatures support different playstyles; whereas some Locust are powerful and are better at killing enemies with large area-of-effect attacks, others excel in destroying barriers and other fortifications with their speed and accuracy.
Unlike Horde 2.0, rewards only stay unlocked during the current play-through and will need to be unlocked again during subsequent sessions.
During the week of Easter Sunday, there was a unique limited-time add-on to the creatures to pick from in Beast. All tiers had a unique variant of the Savage Grenadier, which all had different weapons (e.g. 4th tier with a Torque Bow, 2nd tier with a Sawed-Off, and so on). The enemies you faced were also different, not to mention tougher. 1st wave had some Onyx Guards, last wave had 20+ enemies, etc. To date, everything is back to default.
Tier 1
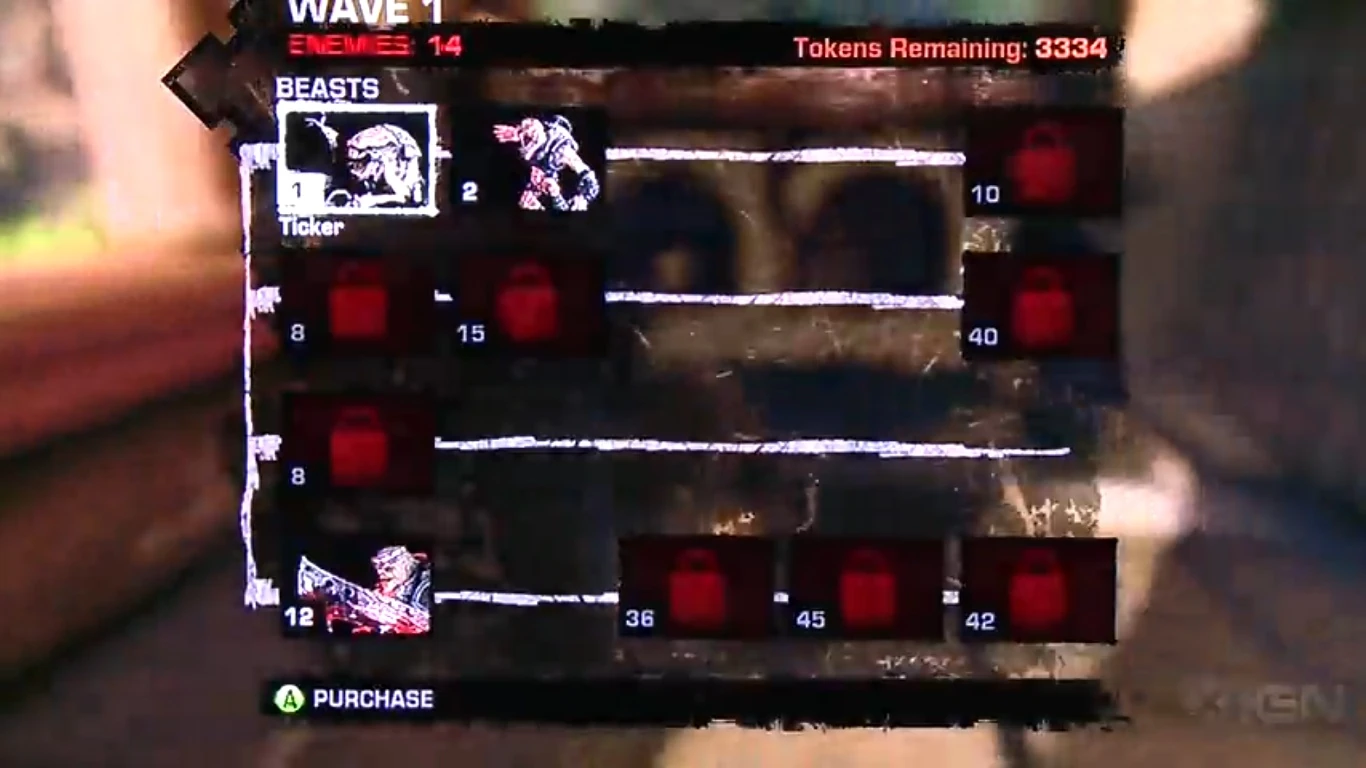
The four tiers are presented as rows, with the top row being the first and the bottom row being the last.
The original Locust interface in Beast mode.[3]
- Wild Ticker - $75
- Ticker - $75
- Wretch - $225
- Savage Drone - $450
- Butcher - $300
Tier 2
Unlocked at $1,500 earned
- Kantus - $975
- Bloodmount - $750
- Mauler - $1350
Tier 3
Unlocked at $4,000 earned
- Giant Serapede - $1350
- Savage Corpser - $900
- Savage Grenadier - $1050
- Boomer - $1500
Tier 4
Unlocked at $7,500 earned [request verification]
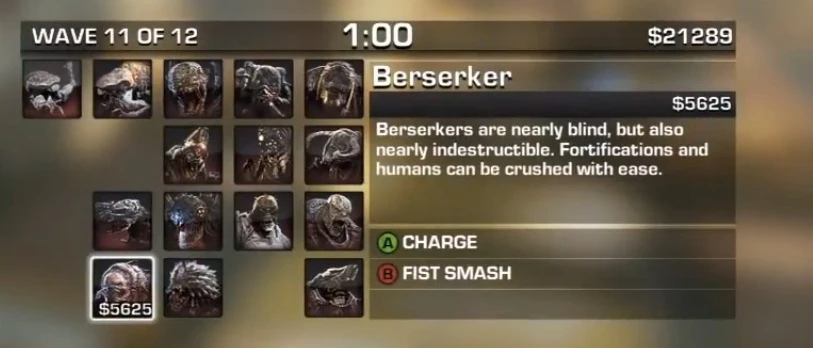
- Berserker - $5625
- Armored Kantus - $3375
- Savage Boomer - $1650
Enemies
Fortifications
- Barriers
- Manned turrets
- Auto-Turrets/Sentries
- Silverbacks
- Decoys
Ordinary enemies
Heroes
Heroes boast more health than other enemies and can only be killed via Executions. They can also be killed in one hit under several circumstances, such as being chewed through via Digger or headshotting (though this only applies to the Savage Grenadier). Each Hero has a set weapon. They show up at Wave 2 and increase in number until Wave 11. At Wave 12, only Richard Prescott is present, accompanied by the elite Onyx Guard, who possess many of the Heroes' traits.
- Marcus Fenix (Lancer)
- Dominic Santiago (Lancer, Gnasher Shotgun, and Smoke Grenade)
- Augustus Cole (Boomshot Grenade Launcher)
- Damon Baird (Torque Bow)
- Anya Stroud (Mortar and Lancer)
- Jace Stratton (Lancer and Sawed-Off Shotgun)
- Samantha Byrne (Retro Lancer and Incendiary Grenade)
- Clayton Carmine (Boomshield, Boltok, and Lancer)
- Dizzy Wallin (Gnasher Shotgun and Bolo Grenade)
- Victor Hoffman (Mulcher, Hammer of Dawn, and Boltok Pistol)
- Aaron Griffin (Sawed-Off Shotgun and Boltok Pistol)
- Richard Prescott (Hammer of Dawn and Gorgon SMG)
General Tips
Overall Tips
- Unlike humans, you cannot regenerate your own wounds. The only way to do this is by having someone as a Kantus (or armored variant) heal you.
- In solo play, if you are playing as a Savage Drone or Grenadier and get incapacitated, you will automatically bleed out, even though you are capable of reviving yourself.
- If you run out of ammo, you will be provided more ammo; however, this is typically delayed, so you may want to melee or take cover until the ammo returns. This applies to any unit using a gun, though the Boomer (and Savage variant) will encounter this problem very frequently.
- Use the Tac/Com to find enemy fortifications, as they will be shown on the screen.
- Destroy everything in your path. The few seconds that they give can be the make-or-break moment to pass the round.
Monsters
Wild Ticker
- Wild Tickers are best used as a cheap way of destroying fortifications, since they can deal a decent amount of damage. They can also swallow grenades and "deliver" it to the enemy.
Ticker
- Use the Ticker as a cheap way of destroying fortifications. They can also be used to incapacitate heroes and kill Stranded/COG Gears.
Wretch
- The Wretch is an agile but frail unit that can deal quick damage in the earlier stages, even when alone. Move in to attack, and back to be dealt less damage from shotgun based weapons.
- 200 Wretch kills are needed for the Instagib Melee mutator for Horde 2.0, which is a powerful mutator.
- The scream the Wretch emits can stun opponents for several seconds, allowing you and/or your allies to quickly rack up damage while they are stunned. It is recommended for someone to play as the Wretch briefly when someone pilots a Silverback to knock them out on harder difficulties, since the Silverback can shred everything in mere seconds.
Savage Drone
- The Savage Drone is a good ranged fighter, as the Retro Lancer deals considerable damage and can be burst fired at short or long range to effectively deal damage to opponents. The retro charge can also be used to kill heroes immediately.
Butcher
- Butchers are great for taking out fortifications.
- The cleaver should be used in the early rounds.
- Butchers are vulnerable in open areas; head for compacted, easily defensible locations.
Kantus
- The Kantus is a support unit. Use its healing screech to heal damaged allies. Ensure that you are well protected, since you will be vulnerable while chanting and can easily die.
- The Kantus cannot get into cover as it's tall, so try to find something that provides enough cover for you to substitute for it.
- Use the Ink Grenade to cut off humans from going to a specific spot and to immediately dislodge humans using the Silverback.
Bloodmount
- The player controls the Bloodmount; the Beast Rider is AI controlled and uses a Hammerburst.
- The Beast Rider can and will attack decoys, so do not rely on it to kill off enemies for you. Use its claw attack to kill enemies quickly and efficiently.
Mauler
- The Mauler has a powerful explosive flail and Boomshield. Use the Boomshield to deflect enemy fire; you will be safe from most attacks, apart from Silverback rockets and anyone attacking you from the side or back.
- The flail can typically kill opponents in one hit, while it takes 2 to kill heroes. It is also good for getting rid of fortifications. A good combo is to swing the flail, then cover yourself immediately with the Boomshield to minimize damage taken. If cover is available, try to hide behind it while using the flail.
Giant Serapede
- Like in Campaign and Horde 2.0, Giant Serapedes invulnerable to damage unless they are attacked from their vulnerable back. Try to keep the back hidden from view when attacking so the enemy will not kill you almost immediately.
- The low height of the Serapede makes it useful for sneaking on enemies and zapping them with its pincers.
Savage Corpser
- The Savage Corpser is the only Beast unit that can heal itself without the assistance of other units, by burrowing itself underground. Unlike the Savage Corpsers in Campaign and Horde 2.0, you cannot use the claw attack underground.
- Use the Corpser's claws to deal damage to both fortifications and enemy units alike, as it deals a lot of damage.
Savage Grenadier
- Use the Bolo Grenade to deal damage to enemies and fortifications. Try to aim for torso/headshots with the Gnasher.
Boomer
- The Boomer is best used as a long range attacker to quickly kill Stranded/COG Gears and incapacitate Heroes. It is also decent for destroying fortifications, and has a melee attack of its own.
- The Boomshot the Boomer uses has a much more longer reload time, so make sure your hits count.
- For best results, fire at a group of humans at a distance and hide behind a wall when reloading. Like the Kantus, Boomers cannot take cover.
Berserker
- Use the Berserker sparingly, and only if you really want/need to use it. The Berserker costs a lot of money ($5625) and using it often can quickly deplete your cash stack.
- The Berserker can destroy everything in two hits. It is capable of killing Stranded/COG Gears in one hit, and heroes in two. Her carapace also makes her very durable to bullet fire.
- The Berserker moves somewhat slowly, so you will need to continually run to catch fleeing humans and reach them quickly if they are on the other side of the map. The charge attack is great for destroying barriers quickly and the smash attack will deal with any enemy units/fortifications near her.
- Avoid incendiary sentries and Scorcher-using units, since they weaken the Berserker's armor and stun her briefly. You do not need to worry about laser wires, since you will destroy them immediately.
- Berserkers have reduced sight, although the sight is still reasonable enough for a player to spot enemies in front of her.
Armored Kantus
- The Armored Kantus is used the same way as a regular Kantus. It also has a roll attack that can kill incapacitated opponents.
- Like the Berserker, you will take less damage from bullet fire, though explosives are still a big concern.
Savage Boomer
- The Savage Boomer is much like a regular Boomer, except the Savage Boomer is better against infantry, since the Digger Launcher is effective against covered opponents.
- Try to aim directly at the torso, since the Digger will immediately chew through it and explode, killing the target immediately and wounding/killing more near it.
Maps
- Use a map that you think has the best advantage to the team. Trenches is perhaps the best map to play Beast on, due to its small size making it easy to reach the enemy.
Behind the scenes
- There were originally twenty playable Locust creatures rather than the fifteen that are present in Gears of War 3; the Grenadier Elite and Grinder were originally in Beast mode (as seen in the E3 2010 gameplay) but were later removed from the final game.
References
| Multiplayer modes | ||
|---|---|---|
|
Annex · Arcade · Arcade (Gears 5) · Arms Race · Assassination · Beast · Breakthrough · Capture the Leader · Dodgeball · Domination · Escalation · Escape · Execution · Guardian · Horde · Horde 2.0 · Horde 3.0 · King of the Hill · Master at Arms · OverRun · Submission · Survival · Team Deathmatch · Warzone · Wingman | ||